A floating shelf looks simple right up until you try to make one sit dead level, carry real weight, and keep its clean edge over time. That tension between minimal appearance and structural honesty is exactly why learning how to build floating shelves is such a satisfying woodworking project. Done well, they read as quiet architecture rather than just storage.
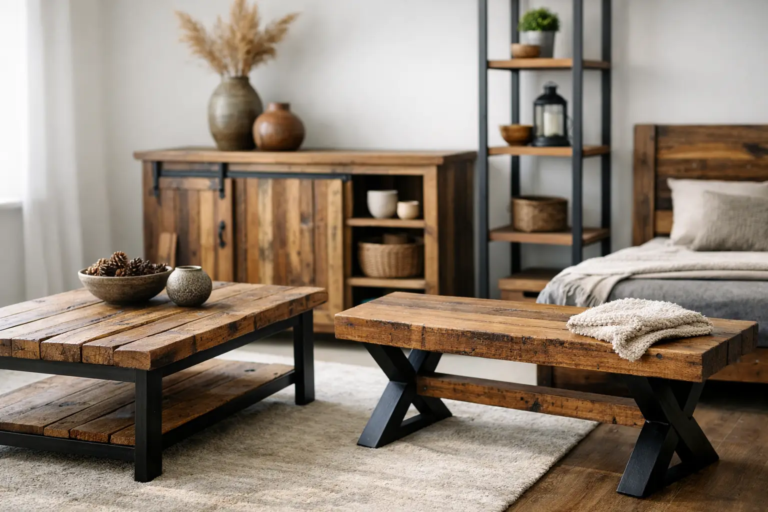
For a modern interior, floating shelves work best when the proportions are intentional. Too thick, and they feel bulky. Too thin, and they look underbuilt even if they are technically strong. The sweet spot for most residential spaces is a shelf that appears visually light from the front while still enclosing a solid hidden support system. That usually means treating the shelf as two parts: a wall-mounted cleat or steel support, and a hollow wood sleeve that slides over it.
How to Build Floating Shelves With a Clean Structure
The biggest mistake beginners make is thinking the shelf box is the structure. It is not. The hidden bracket is the structure. The wooden shell is the visible finish layer. Once you separate those two roles, the whole build gets more predictable.
If you are building from wood alone, start with a wall cleat system anchored directly into studs. A straightforward version uses a horizontal back cleat with hardwood support arms projecting out from it, almost like a ladder turned sideways. That support frame gets fixed to the wall, and the finished shelf sleeve slips over it. For shorter shelves in solid framing, this works well and keeps the build entirely wood-based.
If you want a thinner shelf profile or a longer span, steel rods or a fabricated metal bracket can be the better choice. Metal lets you reduce visible bulk while maintaining stiffness. The trade-off is that precision matters more. Rod spacing, drilling alignment, and wall anchoring all need to be exact, or the shelf will fight you during installation.
For most DIY woodworkers, a hardwood cleat system is the most forgiving path. Maple, white oak, and ash are reliable choices because they resist sag better than softwood support members. Pine can work for lightly loaded shelves, but if the goal is a refined, long-term installation, hardwood is worth the extra effort.
Material Choice Matters More Than Most People Expect
The visible shelf skin shapes both the aesthetic and the lifespan of the piece. Plywood is often the smartest choice for the shell because it stays flatter than solid wood, wastes less material, and can be edge-banded or miter-folded for a seamless look. A high-quality veneered plywood in white oak, walnut, or maple gives you a contemporary furniture-grade finish with less movement risk.
Solid wood shelves are appealing, especially when you want natural grain continuity or a thicker sculptural presence. But solid wood introduces movement, especially in wider or deeper shelves. If you build a hollow sleeve from solid lumber and lock it too tightly onto a fixed support, seasonal expansion can cause splitting or telegraph joints over time. That does not mean you should avoid solid wood. It means you should account for movement in the construction.
If sustainability is part of the project, urban lumber or locally milled stock can make the shelves feel more personal and materially grounded. Just be selective. Reclaimed or locally sourced boards need to be fully dried, flattened, and checked for stability before they become a finished sleeve. Beautiful material still has to behave.
Good dimensions for most rooms
A shelf depth between 8 and 12 inches handles books, ceramics, and everyday objects without dominating the wall. Thickness is more flexible, but most floating shelves look balanced between 1 1/2 and 2 1/2 inches thick. For spans longer than about 36 inches, increase support strength before increasing visual thickness. Bulk should not be your first answer to structure.
Build the Hidden Support First
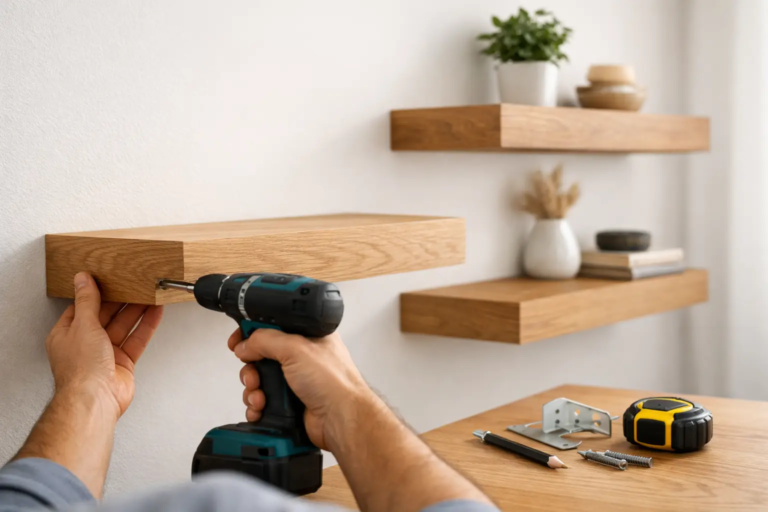
Begin by locating the studs and marking a perfectly level reference line. This is not glamorous work, but it determines whether the finished shelf feels custom or improvised. Use the longest level you have, and check your measurements twice from a fixed architectural point like the floor or countertop.
Cut a back cleat from straight hardwood, usually 3/4 inch to 1 inch thick and 2 to 3 inches tall. Then add projecting support arms of the same thickness, spaced about 8 to 12 inches apart depending on shelf length and expected load. Glue and screw these together so the frame acts as one rigid unit. The support arms should stop short of the front edge of the finished shelf, leaving enough room for the sleeve face to remain clean.
Test-fit the frame on the bench before it ever touches the wall. Check for twist. Check for square. A small error in the support becomes very visible once the shelf is installed.
When mounting the frame, use structural screws driven into studs. Drywall anchors are not a substitute if you plan to hold books, dishes, or heavier decor. If your stud layout does not cooperate with the shelf design, that is the moment to adjust the design or use a metal support strategy. Floating shelves reward realism more than optimism.
Build the Shelf Sleeve for Precision, Not Speed
The sleeve can be made from top and bottom panels with a solid front edge and thinner side returns, or as a mitered wrap for a cleaner modern look. A mitered sleeve usually looks more refined because the grain can appear to fold around the form, but it demands cleaner stock prep and more careful glue-up.
A practical build uses 3/4 inch material for the top and bottom, plus a solid wood front edge that creates the illusion of greater thickness. If you need a 2-inch-thick shelf, the face can be built to that dimension while the internal cavity remains sized for the support frame. This approach keeps the shelf lighter and easier to install.
Dry-fit the sleeve over the hidden support before final sanding and finishing. It should slide on with gentle resistance, not force. Too loose, and the shelf can rack or feel cheap. Too tight, and installation becomes risky, especially after finish is applied.
Joinery choices that work
For the sleeve, glue alone can be enough if your miters or long-grain joints are accurate. Biscuits, dominos, splines, or brad nails can help with alignment, but they should support precision rather than compensate for poor fit. In a design-forward piece, clean joinery is part of the visual standard, even when most of it stays hidden.
If the shelf will be painted, MDF can produce a very crisp result, especially in minimalist interiors. But MDF is heavier, less durable at corners, and less forgiving around moisture. For natural finishes, real wood veneer plywood or solid wood is the stronger choice.
Sanding, Finishing, and Installation
A floating shelf is usually viewed up close, often at eye level, so surface quality matters. Ease the sharp edges slightly with sandpaper rather than leaving them knife-crisp. That subtle softness makes the shelf feel finished and reduces chipping.
For white oak, walnut, maple, and similar hardwoods, a matte hardwax oil or a durable wipe-on varnish keeps the look contemporary while protecting against daily handling. Gloss tends to work against the quiet architectural quality that makes floating shelves appealing. If the room includes brass accents, stone, or other refined materials, a low-sheen wood finish usually integrates better than anything shiny.
Install the support frame first and confirm it is level after fastening. Then slide the finished sleeve onto the frame and secure it from the top or underside with a few concealed screws if needed. In some builds, friction and precision are enough. In family spaces, kitchens, or high-use areas, a discreet mechanical fastener is usually the smarter choice.
What Changes in Kitchens, Bathrooms, and Living Spaces
Not every floating shelf should be built the same way. In a living room, the priority is often visual proportion and moderate load. In a kitchen, the priority shifts toward heavier weight, cleanability, and resistance to humidity swings. In a bathroom, moisture resistance becomes even more important, which can make plywood cores and stable finishes more attractive than highly reactive solid lumber.
Styling also affects construction. A shelf meant for a few ceramics can be lean and elegant. A shelf expected to carry cookbooks, serving ware, or audio equipment needs a more serious support system. The design should respond to the use, not just the photo reference.
At Wallace Wood Working LLC, that balance between appearance and honest construction is what makes simple furniture forms worth building. Floating shelves are a good example. They ask for restraint in the design and discipline in the execution.
There is a reason the best floating shelves feel almost inevitable in a room. They are not just attached to the wall – they are proportioned, supported, and finished with enough care that the structure disappears and the craftsmanship remains.